Connect Nightscout CGM data to Glucobyte
.png)
How to Connect Nightscout to Glucobyte (Complete Setup Guide)
If you already run a Nightscout site, connecting it to Glucobyte takes about two minutes. If you've heard the name but never set one up, this guide walks through the whole path — what Nightscout actually is, how to get a site running, how to get your CGM data flowing into it, and how to link it to Glucobyte.
What is Nightscout, in plain English?
Nightscout is a free, open-source project that gives you your own private website showing your continuous glucose monitor (CGM) data in real time. It was built by parents of kids with diabetes who wanted to see their child's glucose readings from anywhere, and it's been maintained by volunteers ever since.
The important thing to understand: there is no Nightscout company and no central Nightscout service. Each person runs their own copy. That's why there's nothing to "sign up" for in a normal sense — and why, once you have a site, any app you choose can read from it, including Glucobyte.
In practice, a working Nightscout setup has three pieces:
1. A site — your own private web address, e.g. `https://mysite.example.com`
2. An uploader — something that pushes your CGM readings into that site
3. An access token — a credential you create so apps can read your data
Once those three exist, Glucobyte can import your history and keep it up to date automatically.
Before you go further: what Nightscout is not
Nightscout is a community project, not a regulated medical device. In the project's own words, it is "not officially approved or regulated for diabetes therapy and/or treatment in any way." Never rely on Nightscout — or any app reading from it, including Glucobyte — as your only way of knowing your glucose levels. Always keep your manufacturer's app, receiver, or a meter available, and make treatment decisions the way your care team has advised.
Support is also volunteer-driven. The documentation is blunt about it: running a Nightscout site "doesn't entitle you to any form of support from anybody." The community is genuinely helpful, but it's people donating their time.
Step 1: Get a Nightscout site
You have two routes. Be honest with yourself about which one you are.
Option A: Use a hosting service (recommended for most people)
You pay a small monthly fee and someone else handles the servers, updates, and backups. Setup is usually a matter of signing up and waiting a few minutes. Established options include:
- Nightscout Pro — hands-off managed hosting, no configuration needed
- T1Pal — managed service from Ben West, one of the original Nightscout core developers
- NS10BE — managed hosting based in Germany, GDPR-compliant, running since 2017
Pricing sits in the range of a few dollars/euros/pounds per month up to around $12, depending on the provider and how long you subscribe for. Check each provider's site for current rates — they change.
If you're not the sort of person who enjoys deploying web apps, stop here and pick one of these. It is genuinely the right answer for most families.
Option B: Host it yourself (free to cheap, more work)
Nightscout is open source, so you can deploy it yourself. The official documentation maintains up-to-date guides and comparison charts for every supported platform:
- New Nightscout Users guide — start here
- Choose your platform — compares the current free and paid options
At the time of writing, free DIY platforms include Azure, Northflank, Render, Google Cloud and Oracle, with MongoDB Atlas commonly used for the database; paid options include Heroku, Railway and Fly.io. You can also run it on your own hardware — a NAS, a Raspberry Pi, or Home Assistant.
Two honest warnings. First, the free tiers of these platforms change often — a guide from two years ago is probably wrong, so always follow the current official docs rather than an old blog post (including this one; the platform list above is a snapshot). Second, some free tiers put your site to sleep when it's idle, which can make apps look like they've lost the connection. The official docs are the source of truth here.
Step 2: Get your CGM data into Nightscout
An empty Nightscout site has nothing for Glucobyte to import, so this step matters. What you use depends on your CGM. The official Supported Uploaders page is the definitive, maintained list, but here's the shape of it:
Dexcom. The simplest path is the built-in Dexcom Share bridge — Nightscout pulls readings from Dexcom's servers directly, with no extra app running on your phone. You'll need Share enabled in the Dexcom app. Alternatively, xDrip+ (Android) or xDrip4iOS can upload for G5/G6/G7, ONE/ONE+ and Stelo.
FreeStyle Libre. For Libre 2, 3 and their Plus versions, the LibreLinkUp bridge or Juggluco are common choices; xDrip+ (Android) and xDrip4iOS also work. Libre 1 generally needs an add-on transmitter such as MiaoMiao, Bubble or Blucon.
Medtronic. xDrip+ on Android, Guardian Monitor on iOS, or the 600-series uploader for older pumps.
Others. Juggluco covers AccuChek SmartGuide and Sibionics; there are dedicated bridges for Tandem (tconnectsync), Eversense, Medtrum and Diasend.
Closed-loop users. If you run AndroidAPS, Loop, Trio or iAPS, you're already set — these systems upload glucose, insulin and carbs to Nightscout as part of normal operation. This is the setup that gets the most out of Glucobyte's Nightscout import, because all four data types flow through.
One thing worth knowing before the next step: Nightscout only contains what your uploader sends it. Some uploaders send glucose readings only; others also send insulin doses, carbs and notes. If insulin and carbs don't show up in Glucobyte later, this is almost always why.
Step 3: Create an access token
Nightscout has a master password called the `API_SECRET`. You can use it to connect apps, but you shouldn't — it's the key to everything, including changing your settings. Instead, create a read-only access token, which you can revoke at any time without disturbing anything else.
On your Nightscout site:
1. Open the menu (the three horizontal bars) and choose Admin Tools
2. Under the authentication section, click Add new Subject
3. Give it a name you'll recognise later — e.g. `glucobyte`
4. Set the role to readable (read-only access; it cannot add or change anything)
5. Click Save, then copy the token string that appears
Full details are in the Nightscout security and tokens documentation, which also explains the other roles (`admin`, `careportal`, `denied`, `devicestatus-upload`).
Keep that token somewhere safe, like a password manager. Treat it like a password — anyone with it can read your glucose data.
Step 4: Connect Nightscout to Glucobyte
Now the easy part. In Glucobyte:
1. Tap the History tab
2. Tap Cloud at the top of the screen
3. Choose Sync with Nightscout
4. Enter your Nightscout Site URL— for example `https://mysite.example.com`
5. Paste your access token into the Access Token / API Secret field
6. Tap Connect & Sync
That's it. Glucobyte verifies the connection, then imports your history.

A few notes on the fields:
- The URL is the same address you'd open in a browser to see your Nightscout site. You don't need to add `/api/v1` or any other path — just the site address.
- The token field is optional. If your site is configured to allow reading data without signing in, you can leave it empty. If you'd rather use your `API_SECRET` than a token, that works too — Glucobyte handles both — but a read-only token is the safer choice.
What gets imported
Glucobyte pulls in everything Nightscout can meaningfully provide:
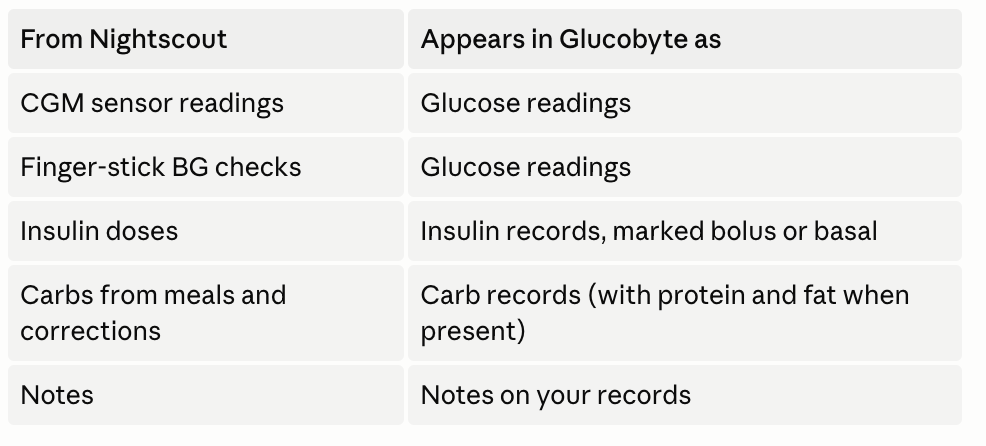
Ketones, weight and workouts aren't part of Nightscout's data model, so those stay whatever you've logged manually in Glucobyte.
Glucose values follow whichever unit you've set in Glucobyte — mg/dL or mmol/L — regardless of how your Nightscout site displays them.
What happens after the first sync
- First import covers the last 90 days. With CGM data every five minutes, that's tens of thousands of readings, so give it a moment to finish.
- After that it syncs itself. Glucobyte checks for new data when you open the app and roughly every five minutes while you're using it. There's also a Sync Now button and a Last Synced timestamp on the Nightscout screen.
- Re-syncing never creates duplicates. Glucobyte tracks which Nightscout records it has already imported, so you can tap Sync Now as often as you like.
- It's one-way and read-only. Glucobyte reads from Nightscout and never writes to it, so nothing you do in the app can alter or damage your Nightscout site.
- Disconnecting keeps your data. If you tap Disconnect, Glucobyte forgets your site and token, but every record it already imported stays in your history.
- Each profile connects separately. If you use Glucobyte for more than one person, the Nightscout connection belongs to the profile that created it, so data can't cross between family members.
Troubleshooting
Please enter a valid Nightscout site URL. Almost always a typo. Check that you have `https://` at the start, a colon (not a dot) before any port number, and no stray spaces. Paste it rather than typing it if you can.
Could not connect to your Nightscout site. Work through these in order:
1. Open the same URL in your phone's browser. If it doesn't load there, the problem is the site, not Glucobyte.
2. If you're on a free hosting tier, your site may have gone to sleep — loading it in a browser usually wakes it, then try again.
3. Re-copy the token; a truncated paste is the single most common cause.
4. Confirm the token still exists in **Admin Tools** and hasn't been deleted.
Glucose readings appear, but no insulin or carbs. Your uploader probably isn't sending treatments. Check your uploader's Nightscout settings, and see the Supported Uploaders page for what your setup can send.
You're up to date. No new records found. Not an error — Glucobyte already has everything your site currently holds.
Nothing older than 90 days imported. That's by design; the first sync covers the last 90 days.
Frequently asked questions
Does my data pass through Glucobyte's servers?
No. Your device talks directly to your own Nightscout site. (Separately, if you use Glucobyte Cloud backup, imported records are backed up along with everything else in your history — that's your choice and controlled by that setting.)
Do I have to give Glucobyte my API secret?
No, and we'd recommend you don't. A read-only access token is enough, and you can revoke it at any time.
Can Glucobyte damage or change my Nightscout site?
No. The integration only reads.
Do I need Nightscout to use Glucobyte?
Not at all — Glucobyte works fine on its own with manual entries and Apple Health. Nightscout is there for people who already run a site, or whose CGM is easiest to reach that way.
Is Nightscout free?
The software is free and open source. Running it costs either your time (self-hosting on a free platform) or a small monthly fee (a hosting service).
Can I use it for two children?
Yes. Create a separate profile in Glucobyte for each person and connect each one to that person's own Nightscout site.
Useful resources
Official Nightscout
- Nightscout documentation — the authoritative source for everything
- New user setup guide
- Choose your hosting platform
- Supported uploaders by CGM brand
- Tokens, roles and security
- The Nightscout Foundation —the non-profit supporting the project
Community help
- CGM in the Cloud — the main Facebook support group, with tens of thousands of members. There are also many local groups by country and language.
Managed hosting
- Nightscout Pro · T1Pal · NS10BE
Closed-loop systems that upload automatically
- AndroidAPS documentation
Nightscout is an open-source project maintained by volunteers. Glucobyte is not affiliated with, sponsored by, or endorsed by the Nightscout Foundation. Nightscout is not a regulated medical device and is not approved for diabetes therapy or treatment decisions. Glucobyte is intended for informational and record-keeping purposes and is not a substitute for professional medical advice — always consult your healthcare provider about your diabetes management.